
Prerequisites & Setup
Your Mission: Meet ByteStrike
Welcome! In this workshop, you'll learn AI-assisted development by helping ByteStrike, a tech-savvy operative for the secret tech agency known as "The League."
ByteStrike has just been assigned their first mission: Fetch encrypted blueprints from a remote server and extract critical secrets hidden between {* and *} markers. The only problem? ByteStrike needs to write code to do it in multiple languages, under pressure, with questions about how to do it right in production.
Over this workshop, you'll help ByteStrike:
- Learn how to write code with AI assistance (Parts 1-3)
- Ask questions and iterate using Chat vs. Agent modes (Part 4)
- Add guardrails for security, privacy, and correctness (Part 5)
- Deploy safely with governance, testing, and enterprise workflows (Part 6)
By the end, you'll have built a production-ready system that teaches architecture with governance, privacy, security, and enterprise best practices, all through the lens of ByteStrike's mission.
Setup: Get Ready for the Workshop
This quick-start helps you prepare your development environment. It assumes you have nothing installed. If you already have a GitHub Enterprise/Business subscription, use it for Copilot (best experience); otherwise use the free tier or trial. Students: claim GitHub Student benefits for Copilot access.
1. GitHub Account (Free)
If you don't already have a GitHub account:
- Visit github.com/join and create an account
- Use a strong password and enable Two-Factor Authentication (MFA) for security
- Verify your email address
If you have an Enterprise or Business account: Sign in with your organization account to access Copilot through your company subscription (recommended for the best experience).
If you're a student: Visit education.github.com/pack, apply with your school email or student ID, and enable GitHub Copilot once approved. This gives you free access to Copilot Pro!
2. Enable GitHub Copilot
Once you have a GitHub account:
- Go to Settings → Copilot in your GitHub account
- Enable Copilot for your account (use your Enterprise/Business subscription if available, otherwise start the free trial)
- For students: After GitHub Student Pack approval, enable Copilot from the same settings page
About GitHub Copilot Subscriptions:
- Free Trial: You can start with a free trial of GitHub Copilot to explore basic code suggestions and assistance
- Agentic Features: If you want to try the advanced agentic features (like Copilot coding agent for autonomous task completion), you'll need a Pro subscription
- Pro Subscription Trial: The Pro subscription is also available as a free trial, so you can test these advanced features risk-free
- Easy Cancellation: You can cancel your Pro subscription anytime within the trial month if you decide not to continue, with no charges
3. Recommended: Use GitHub Codespaces 🚀
Why Codespaces? It's the fastest way to get started: no local installations required!
Benefits of Codespaces:
- ✅ 1-click setup: Environment pre-configured with Git, Node.js, Python, .NET, and VS Code extensions
- ✅ Works everywhere: Runs in your browser or VS Code desktop, no downloads needed
- ✅ Consistent environment: Everyone has the same setup, eliminating "works on my machine" issues
- ✅ Free tier included: GitHub provides 60 hours/month of Codespaces usage for free accounts
- ✅ Save time: Skip installing Python, Node, .NET, and configuring extensions
How to Start a Codespace:
- Fork the repository first: Go to github.com/codess-aus/ByteStrike and click the Fork button (top-right corner). This creates your own copy where you can save your work!
- On your forked repository, click the green Code button
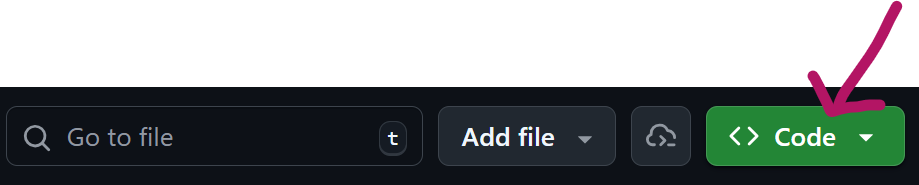
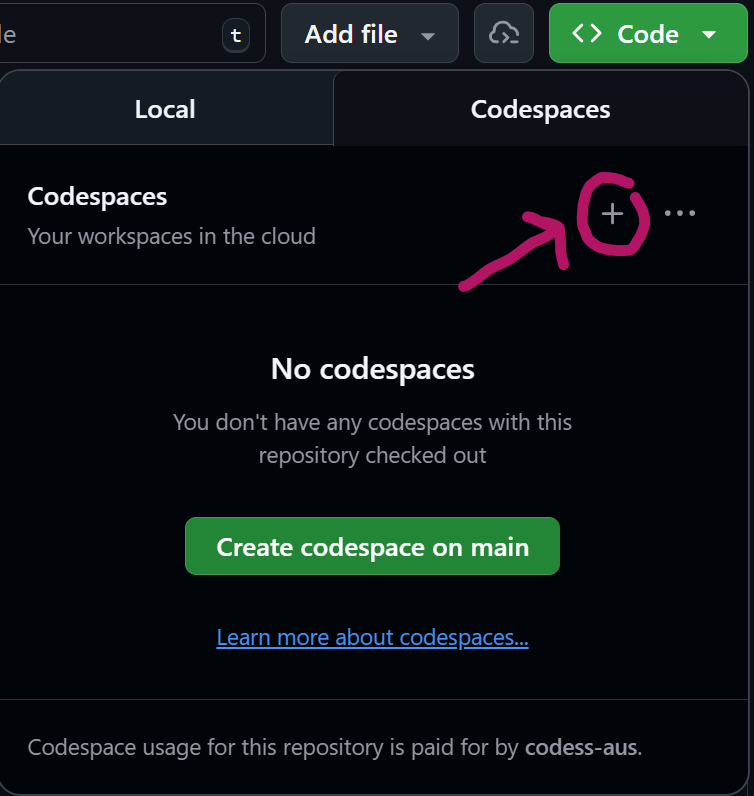
- Switch to the Codespaces tab
- Click "Create codespace on main"
- The creation of the codespace will take several minutes, although it's still far quicker than having to manually install all the services. Grab a coffee and relax while GitHub sets everything up! (First time setup only)
- Start coding! VS Code in the browser opens automatically with Copilot ready
💡 Pro Tips:
- You can open a Codespace in VS Code desktop by clicking the three-dot menu in the Codespace and selecting "Open in VS Code Desktop"
- Your changes auto-save in the Codespace. Use the Source Control panel (Ctrl+Shift+G) to commit and push your work to your forked repository
- Codespaces automatically pause after 30 minutes of inactivity to save your free hours
4. Alternative: VS Code Desktop Setup
If you prefer working locally instead of using Codespaces:
Install VS Code:
- Download from code.visualstudio.com
- Install and launch VS Code
Sign in to GitHub:
- Click the Accounts icon in the bottom-left corner of VS Code
- Select Sign in to GitHub and authorize VS Code
Install Required Extensions:
- GitHub Copilot (by GitHub)
- GitHub Copilot Chat (by GitHub)
Search for these in the Extensions panel (Ctrl+Shift+X or Cmd+Shift+X on Mac) and click Install.
5. Language Runtimes (Local Setup Only)
Skip this if you're using Codespaces! Codespaces has everything pre-installed.
Python
- Install from python.org (version 3.9 or later)
- Verify:
python --versionorpython3 --version - Create a virtual environment for the workshop:
python -m venv .venv - Activate it:
- Linux/macOS:
source .venv/bin/activate - Windows:
.venv\Scripts\activate
- Linux/macOS:
JavaScript/TypeScript (Node.js)
- Install from nodejs.org (LTS version recommended)
- Verify:
node --versionandnpm --version
C# (.NET)
- Install .NET SDK from dotnet.microsoft.com (version 8.0 or later)
- Verify:
dotnet --version
6. Clone the Repository (Local Setup Only)
Skip this if you're using Codespaces! The repo is already available in your Codespace.
Important: Fork the repository first so you can save your work!
- Go to github.com/codess-aus/ByteStrike
- Click the Fork button (top-right corner)
- Clone your forked repository (replace
YOUR-USERNAMEwith your GitHub username):
git clone https://github.com/YOUR-USERNAME/ByteStrike.git
cd ByteStrike
code .
7. Quick Test: Is Everything Working?
Before starting Lab 1, verify your setup:
Test Copilot:
Try Copilot in your preferred language:
- Open VS Code (in Codespace or locally)
- Create a new file:
test.py - Type:
# Write a function that adds two numbers - Press Enter and wait for Copilot to suggest code (appears in gray text)
- Press
Tabto accept the suggestion
- Open VS Code (in Codespace or locally)
- Create a new file:
test.js - Type:
// Write a function that adds two numbers - Press Enter and wait for Copilot to suggest code (appears in gray text)
- Press
Tabto accept the suggestion
- Open VS Code (in Codespace or locally)
- Create a new file:
Test.cs - Type:
// Write a method that adds two numbers - Press Enter and wait for Copilot to suggest code (appears in gray text)
- Press
Tabto accept the suggestion
If you see gray suggestions appear, you're ready to go!
Test Language Runtimes:
# Python
python --version

# JavaScript
node --version

# C#
dotnet --version
All commands should return version numbers without errors.
8. Workshop Materials
All labs and tasks are in the posts/ directory of the repository. Each part includes:
- Theory and best practices
- Hands-on coding tasks
- Reflection questions to deepen your understanding
9. Troubleshooting
Copilot not suggesting code?
- Confirm you're signed into GitHub in VS Code (bottom-left Accounts icon)
- Check that the Copilot extension is enabled (Extensions panel)
- Restart VS Code
Codespace build stuck?
- Delete the Codespace and create a new one
- Check the GitHub Status page for Codespaces issues
Missing language runtimes locally?
- Recommended: Switch to Codespaces to avoid setup friction
- Ensure the runtime is installed and added to your system PATH
Ready to Start!
Once your environment is set up, proceed to Part 1: Welcome & AI-Assisted Development Landscape to begin the workshop.
🎓 Pro Tips for Success:
- Keep Copilot Chat open for quick questions (click the chat icon in VS Code sidebar)
- Experiment freely: Copilot learns from your context and gets better as you code
- Review all AI-generated code before running it: you're the senior developer!
- Use Codespaces if you encounter any local setup issues